How to Fully Automate YouTube Thumbnail Uploads with n8n and ThumbAPI

Every creator knows the pain of context-switching: you finish editing a video, schedule it, and then you have to manually upload the thumbnail. If you are building a programmatic content pipeline, this manual step ruins the entire automation.
This guide walks through the exact setup I used to close that loop — Google Cloud OAuth2 for n8n, a community node for ThumbAPI, and a paste-ready workflow that generates a thumbnail from the video title and pushes the raw bytes directly back to YouTube via Google's Resumable Upload protocol.
If you would rather save the rendered thumbnail to Google Drive instead of overwriting the YouTube one, the n8n thumbnail-to-Drive walkthrough covers that variant.
Step 1: Create a Google Cloud Project
Before we touch anything inside n8n, we need a Google Cloud project so we can issue an OAuth2 client for n8n.
Critical: create the project from the exact same Google account that owns your YouTube channel. If the accounts don't match, the OAuth tokens won't have permission to modify your videos.
- Open the Google Cloud Console welcome page.
- In the top navigation bar, click the project dropdown. If you already have projects, click New Project; if this is your first one, you'll see the option immediately.
- Enter a project name — it isn't critical, e.g.
youtube-auto-thumbnails— and click Create. - If you have multiple projects, select this new one from the top nav dropdown. With only one project it opens automatically.
Step 2: Open APIs & Services
From the Cloud Console dashboard, open APIs & Services (search for it in the top search bar if you don't see it in the side menu).
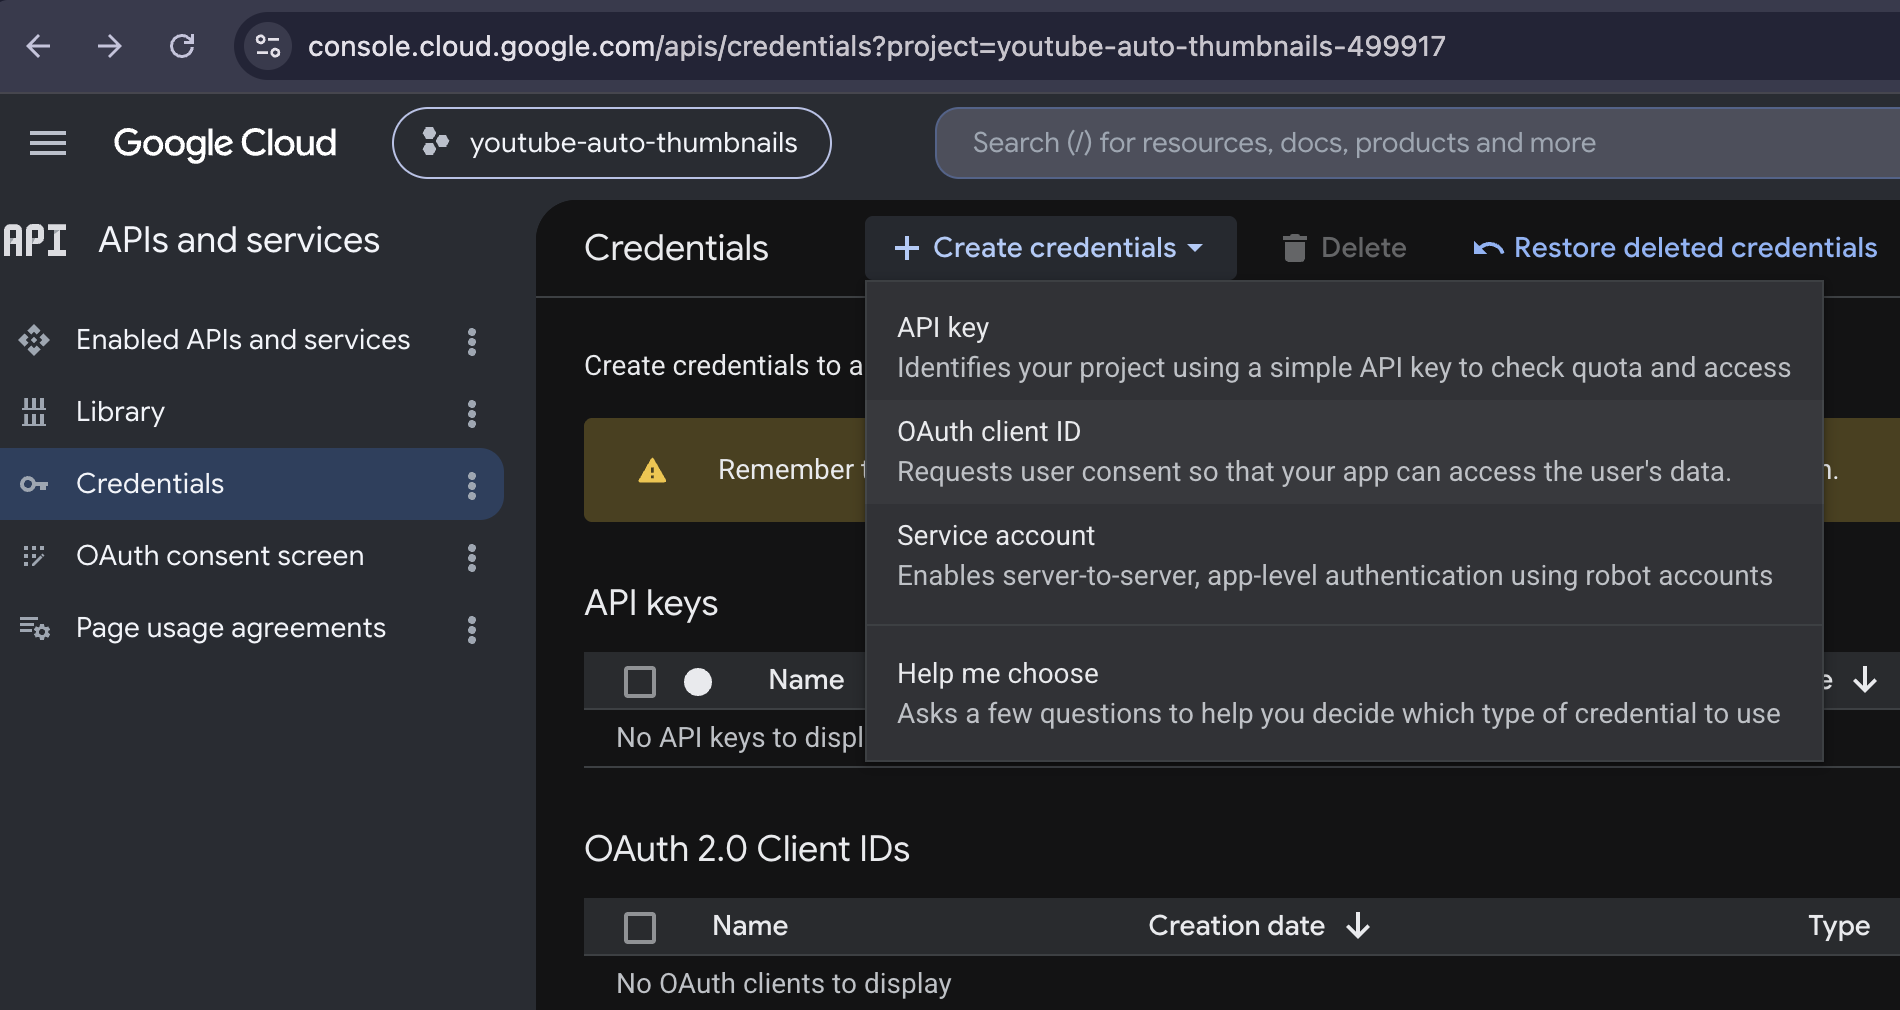
Then go to Credentials → Create Credentials → OAuth client ID.
The first time you try to create an OAuth client, Google blocks you with: "To create an OAuth client ID, you must first configure your consent screen." Click Configure consent screen, then Get started.
Step 3: Configure the OAuth Consent Screen
You'll be walked through a short form. Fill it in exactly like this:
- App information — enter an app name and the support email (your Google account email).
- Audience — pick External. This is for personal channel automation, not an internal Workspace app.
- Contact info — your email again.
- Check the data policy box and click Create.
After saving you'll land on a screen confirming the consent setup. Click Create OAuth client to continue.
Step 4: Create the OAuth 2.0 Client
Now we issue the actual Client ID + Client Secret that n8n will use.
- Application type — choose Web application.
- Authorized JavaScript origins — this depends on where n8n runs:
- n8n Cloud / self-hosted on a domain: paste your instance URL, e.g.
https://n8n.yourdomain.com - Local n8n (this tutorial):
http://localhost:5678/
- n8n Cloud / self-hosted on a domain: paste your instance URL, e.g.
- Authorized redirect URIs — take whatever you entered above and append
/rest/oauth2-credential/callback. So:- Local:
http://localhost:5678/rest/oauth2-credential/callback - Cloud:
https://n8n.yourdomain.com/rest/oauth2-credential/callback
- Local:
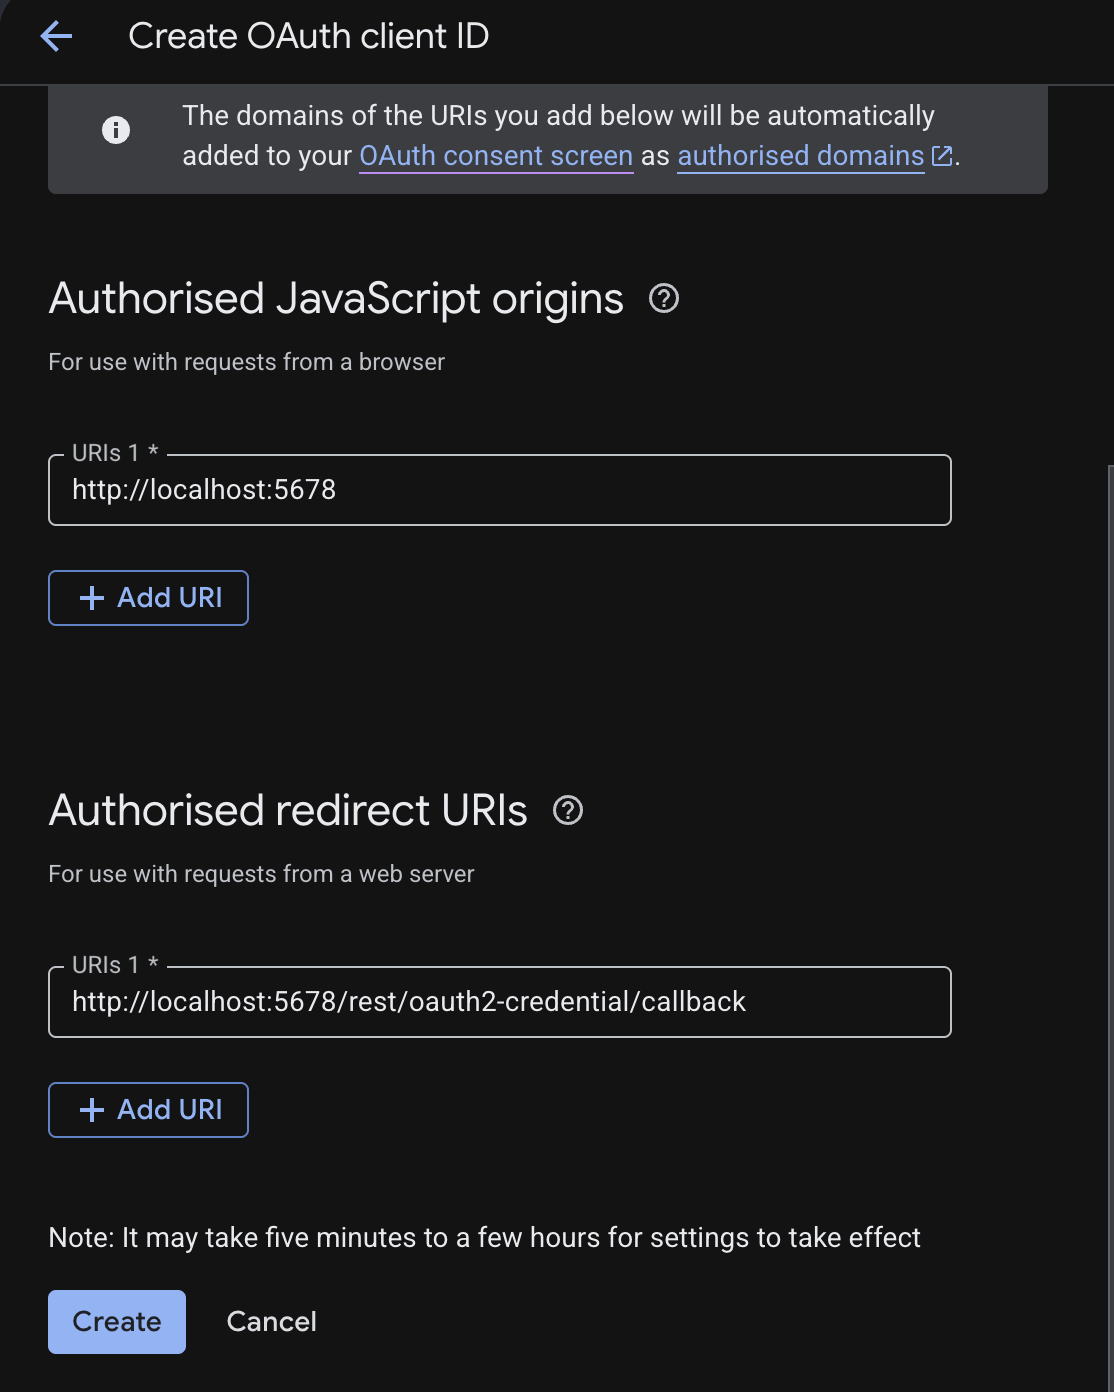
Click Create. A modal pops up with your Client ID and Client Secret.
Save these now. Either download the JSON or copy both fields somewhere safe — you'll need them in Step 6 when wiring n8n. Downloading the JSON is the safer option since you keep access to them later.
Step 5: Add Yourself as a Test User and Enable the YouTube API
Two small but mandatory steps before the API will actually answer.
Add yourself as a test user
Back on the OAuth screen, open Audience in the left sidebar. Under Test users, click Add users and add the Google account email you use for YouTube.
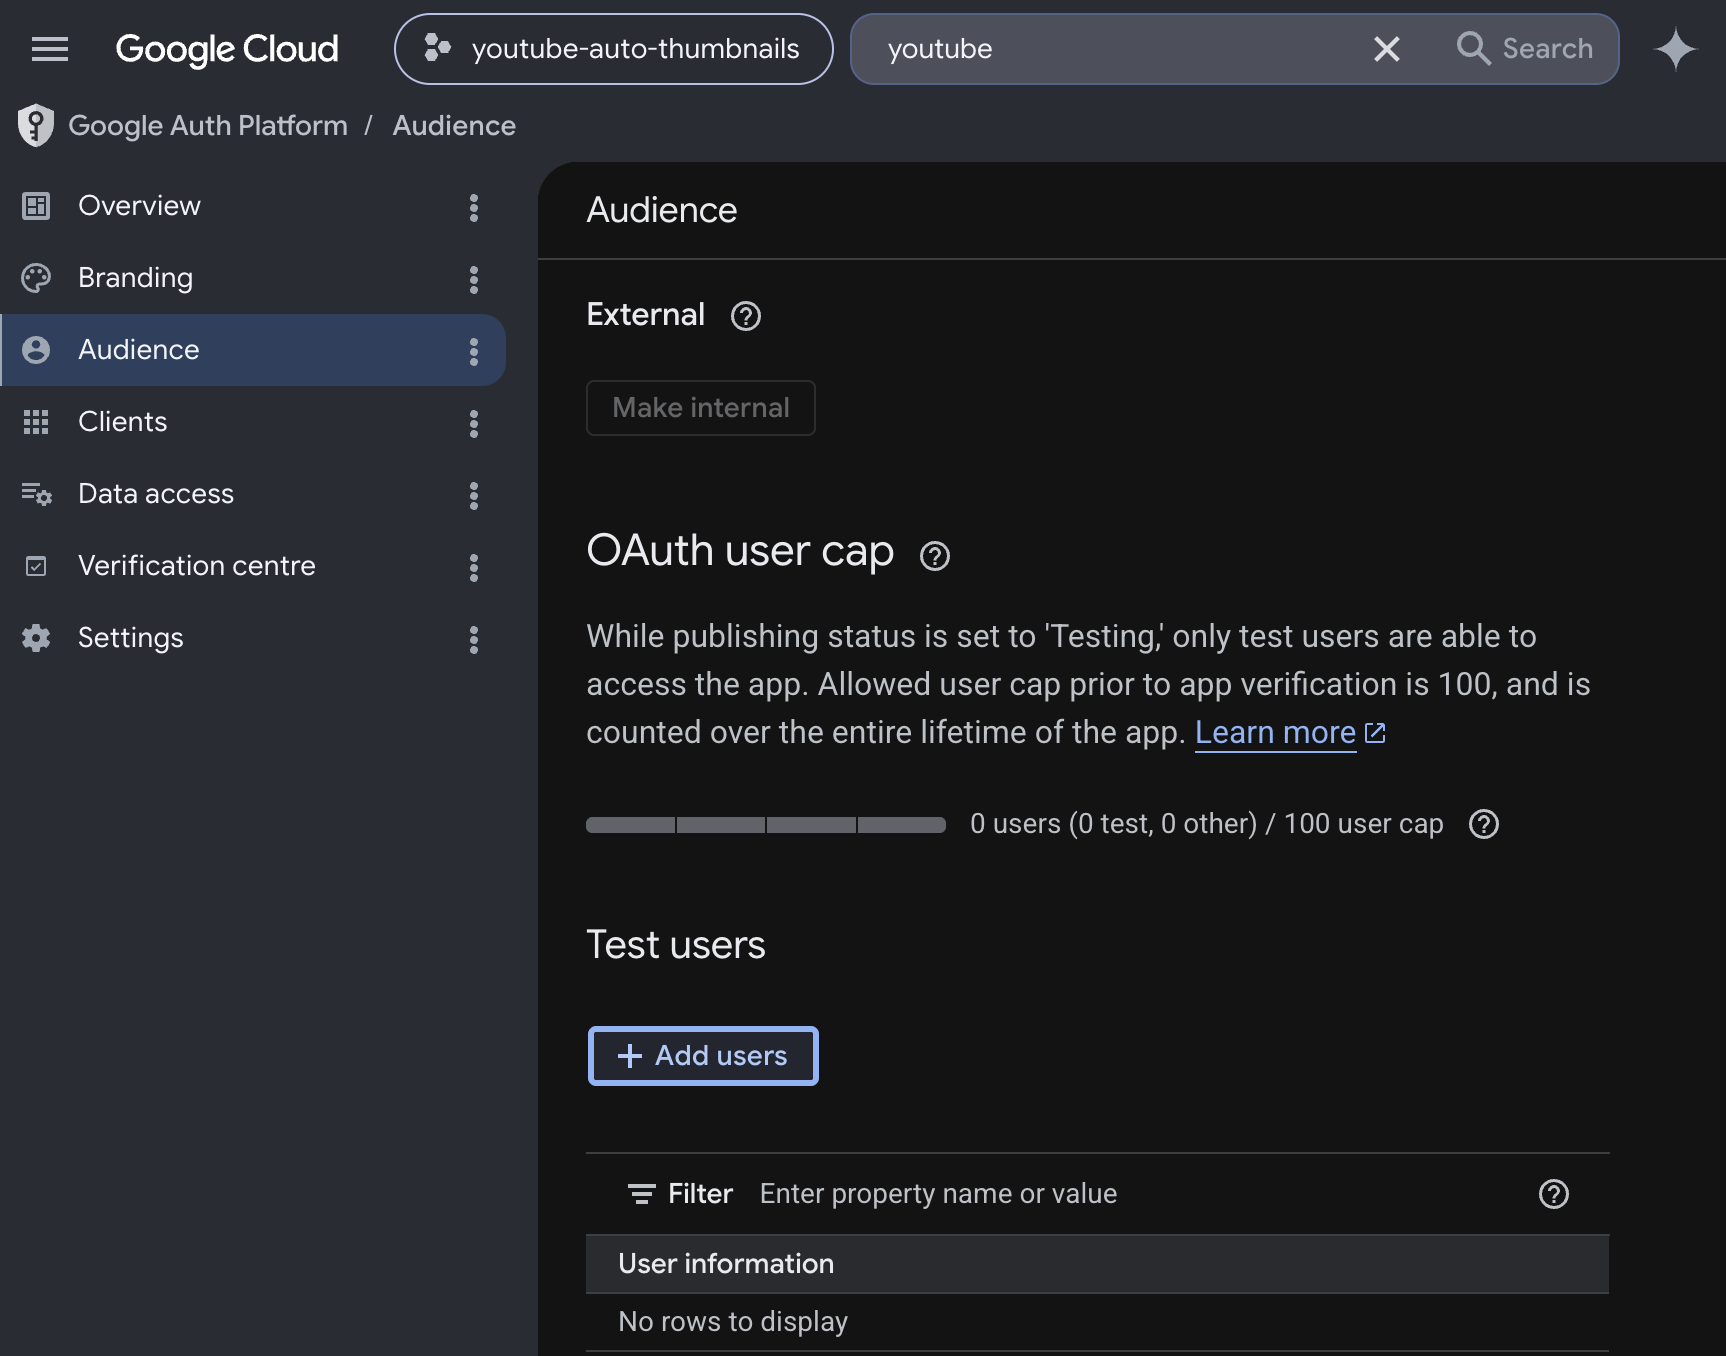
The 403 Forbidden bypass. Skip this step and Google blocks your n8n login with
403 Access Deniedthe moment you try to authorize. It's the single most common reason this integration "doesn't work" for people.
Enable YouTube Data API v3
In the top search bar, type YouTube Data API v3 and pick it from the dropdown.
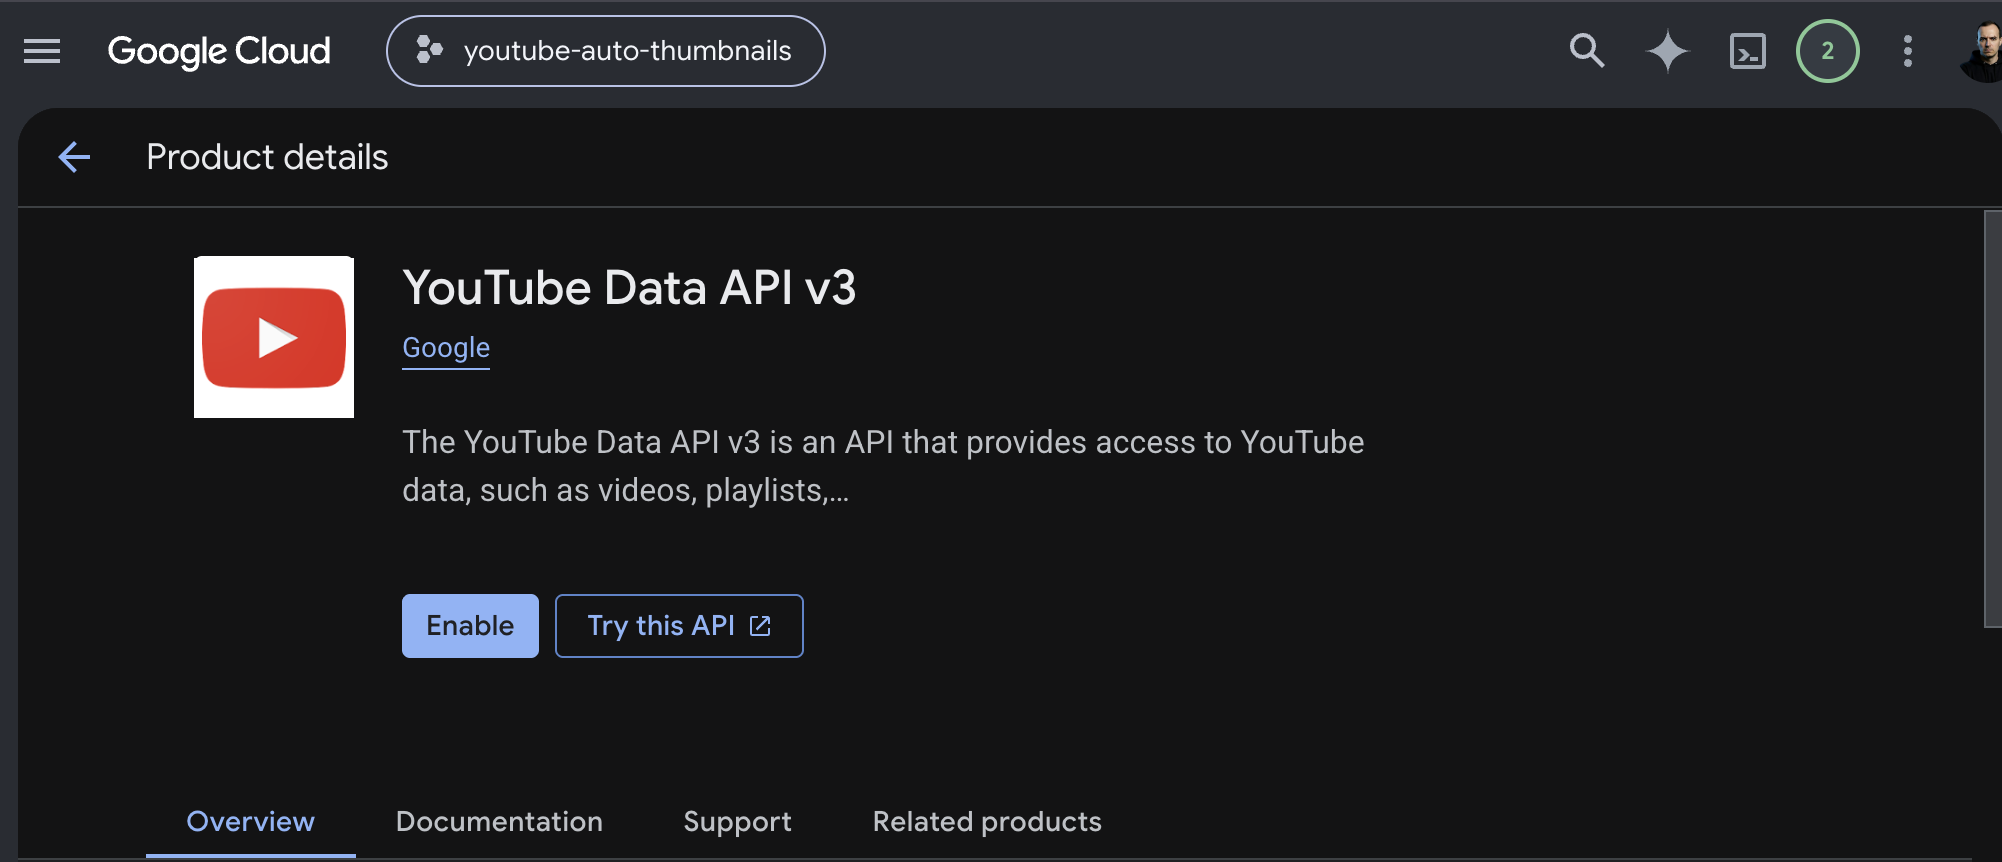
Click the blue Enable button. The project is now allowed to talk to YouTube on your behalf.
That's the Google side done. Now into n8n.
Step 6: Wire Google OAuth2 into n8n
Tip for local n8n: open n8n in an incognito tab before doing this. Logged-in Google session cookies in your main browser can hijack the OAuth handoff and silently use the wrong account.
In your n8n instance:
-
Click + in the top-right corner and choose Add credential.
-
Pick Google OAuth2 API and click Continue.
-
Paste the Client ID and Client Secret you saved in Step 4.
-
In the Scope field, set:
https://www.googleapis.com/auth/youtube -
Click Sign in with Google at the bottom.
A Google auth screen will open. Pick the account that owns your YouTube channel — this needs to be the same email you added as a test user in Step 5.
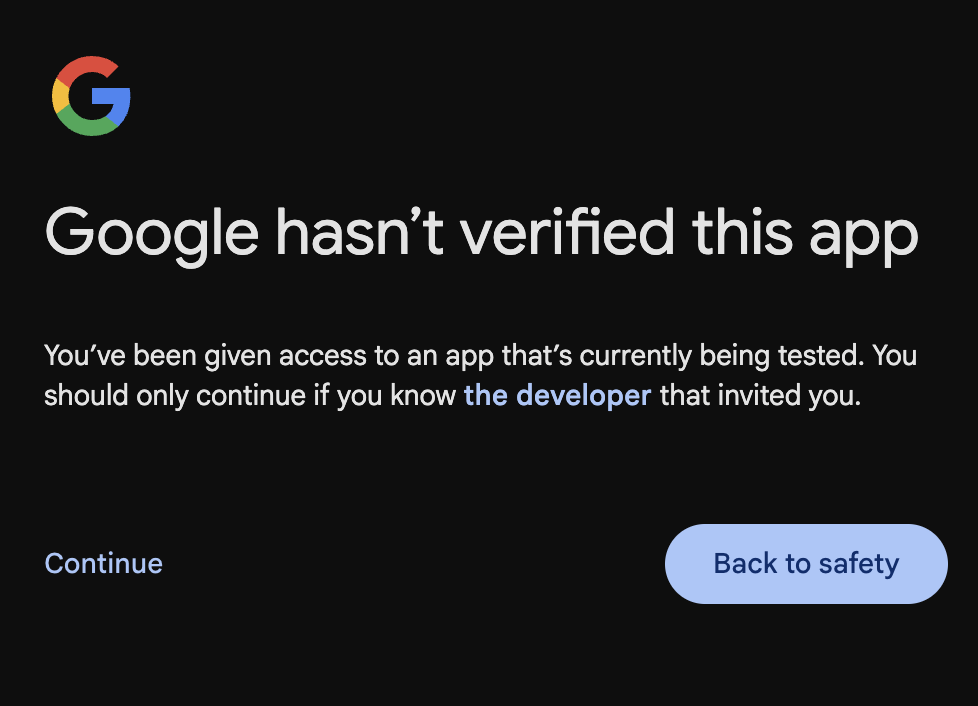
You'll see a yellow warning that "Google hasn't verified this app." That's expected — your app is in testing mode. Click Continue, or Advanced → Go to app (unsafe), and approve all requested permissions.
You should end up back in n8n with a green Connection successful banner and Account connected under the credential.
Repeat: the project must be created from the same Google account that owns your YouTube channel. Same email for OAuth and for YouTube — otherwise the upload step will silently fail later.
Step 7: Install the ThumbAPI Community Node
The workflow uses a dedicated n8n node so you don't have to hand-craft HTTP requests against the ThumbAPI endpoint.
-
In n8n, open Settings (bottom-left) → Community Nodes.
-
Click Install in the top-right.
-
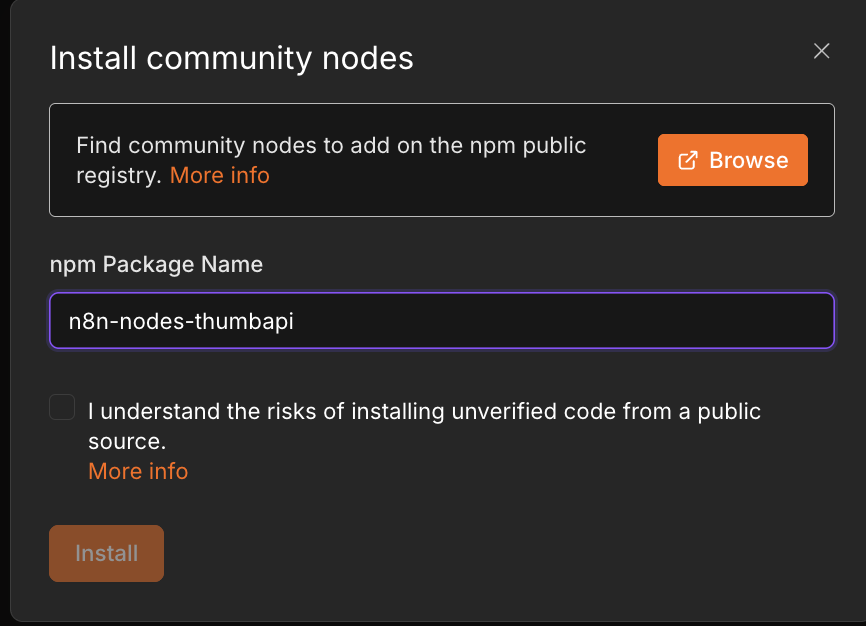
In the npm package field, enter:
n8n-nodes-thumbapi -
Tick the data policy checkbox and click Install.
n8n will pull the package and the ThumbAPI node will appear in the node palette.
Step 8: Paste the Workflow
Everything is in place — now drop in the pipeline. Download the workflow JSON (recommended — avoids any copy-paste mangling), open the n8n canvas, click on the empty grid and press Cmd + V (or Ctrl + V) to paste the whole workflow at once. The full JSON is also inlined at the bottom of this post if you want to scan it first.
Resolving the orange credential warnings
When you paste an external workflow, n8n shows an orange icon on the HTTP-Get upload link node and the Generate a thumbnail node. That's a built-in security behavior — the JSON never carries secrets across machines. You just need to bind your local credentials.
- HTTP-Get upload link → open the node, in the credential dropdown pick the Google account you authorized in Step 6.
- Generate a thumbnail → open the node, in the credential dropdown choose Create New Credential.
Testing mode: in the ThumbAPI credential, paste
thumbapi_testas the API key. This test key bypasses billing and always returns the same placeholder image — perfect for verifying the pipeline end-to-end without spending credits.Production mode: when you're ready for real, branded thumbnails, grab a free production key on app.thumbapi.dev/signup (50 credits per month, no card) and paste it into the credential instead.
Step 9: Set Your YouTube Channel ID
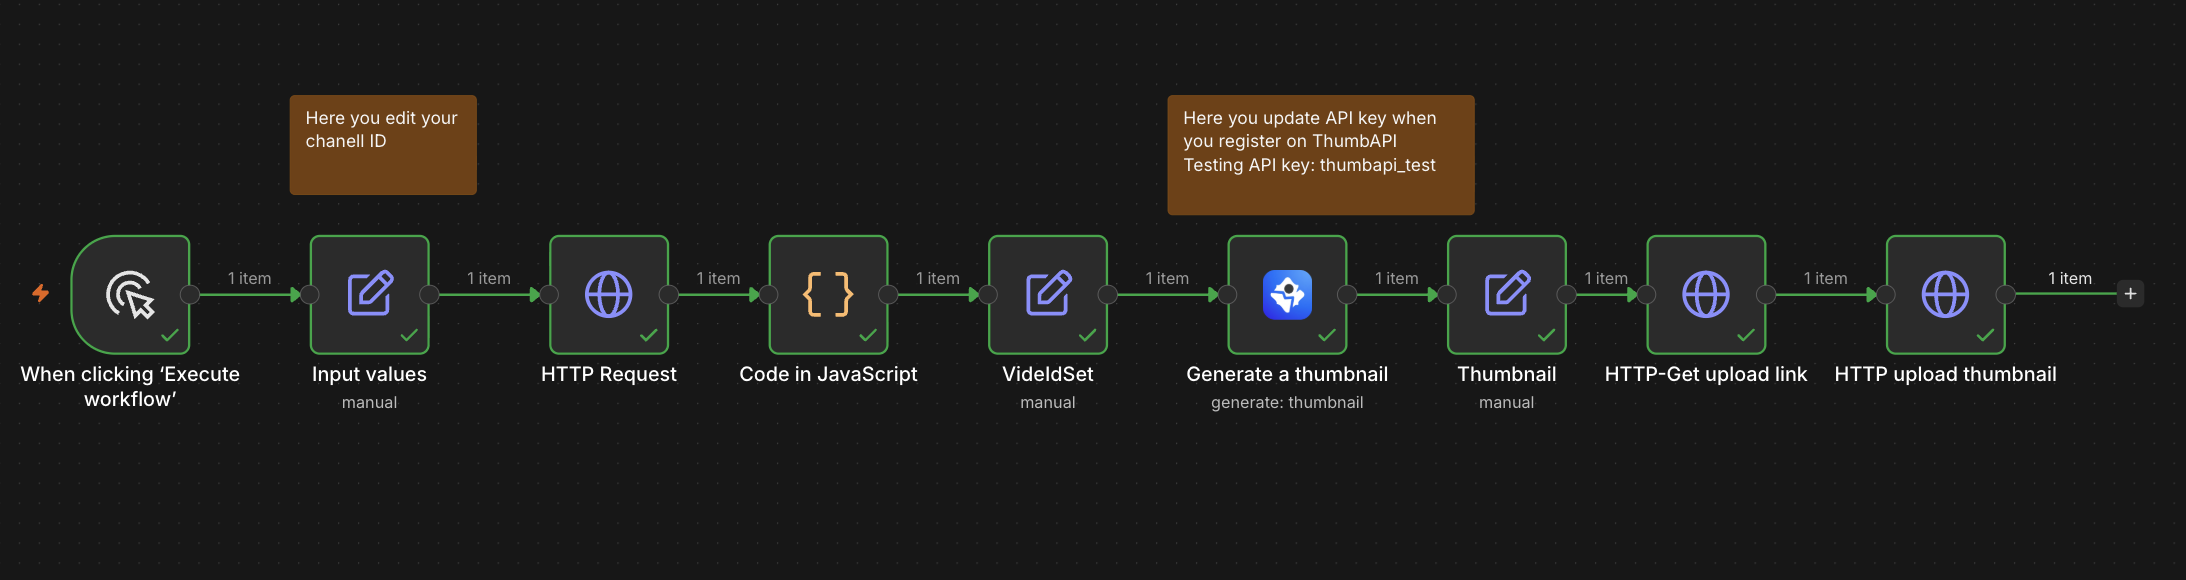
One last thing before you can test. Open the second node — Input values — and replace the placeholder in the ChanelId field with your actual YouTube channel ID.
You can find your channel ID in two places:
- YouTube Studio → Settings → Channel → Advanced settings
- Inside your channel's public URL (the
UC...string)
Paste it in, save, and you're ready to run.
How the Pipeline Works Under the Hood
When the workflow runs, this is what's actually happening:
- Fetch latest video data. The workflow hits your channel's public RSS feed (
https://www.youtube.com/feeds/videos.xml?channel_id=...) to pull your most recent uploads. - Filter & extract. A small JavaScript node strips out YouTube Shorts to isolate long-form uploads, and extracts the
videoIdandtitlefor the most recent one. - Generate the thumbnail. The ThumbAPI node takes the raw title string and renders a
.pngthumbnail. No design tool, no template, no Photoshop — just title in, image out. - Resumable upload handshake. The workflow
POSTs to Google's upload endpoint, declaring the exact byte size of the incoming image. Google replies with a temporary streaming URL in thelocationresponse header. - Binary PUT. The final node
PUTs the raw image bytes to that location URL, and YouTube swaps the thumbnail on the live video in place.
Production Blueprint
This workflow always operates on the most recent video in the feed, which makes it the perfect tail to chain onto a video-upload workflow. Once your upload step finishes, fire this one — and the thumbnail attaches itself within seconds of the video going public.
If you want to personalize the visual style further — embed your profile photo, drop in a brand logo, pick a custom asset set — you don't need to touch the workflow. Toggle Profile photo: on inside the ThumbAPI node, or configure assets visually in the ThumbAPI Studio. The custom asset datasets guide covers the brand-consistency knobs in more detail.
Copy-Paste n8n Workflow JSON
Recommended: download the workflow.json and paste it from there. Copying directly from this code block can occasionally introduce smart-quote or escape-character artifacts depending on your browser, which break the n8n import.
Ship It
The thumbnail step is the last manual choke point in most content pipelines. With this workflow it disappears entirely — Google handles the auth handshake, ThumbAPI handles the design, YouTube serves the result the moment your video goes live.
Start free on ThumbAPI — 50 credits per month, no credit card — paste the workflow above, swap in your channel ID, and let the pipeline run itself.
Need Help?
Stuck on the Google OAuth consent screen, getting a 403, or the upload PUT is misbehaving? Reach out — happy to help you get this running.
- Email: support@thumbapi.dev
- Contact form: thumbapi.dev/contact

Written by
Aldin KozicaFull-stack developer from Bosnia and Herzegovina. I built ThumbAPI because I kept watching content teams waste hours on thumbnail design when the patterns are predictable enough to automate. The API is the tool I wished existed when building content pipelines for my own projects.
Continue Reading
Build an n8n workflow that detects new YouTube uploads, generates a thumbnail with ThumbAPI, and saves it to Drive — fully automated, with batch and multi-platform patterns.
n8n Thumbnail Automation Workflow — Step by StepBuild an n8n workflow that generates production-ready YouTube thumbnails automatically using ThumbAPI. Complete step-by-step guide with node configurations.
How to Generate YouTube Thumbnails Automatically With an APIGenerate YouTube thumbnails automatically from a video title with a single API call. Code examples, batch patterns, and design tradeoffs for production pipelines.
Thumbnail API Tutorial for Python Developers — Full Code ExamplesGenerate YouTube thumbnails, OG images, and blog covers from Python in one HTTP call. Sync requests, async httpx, retries, and a Flask/FastAPI route — all in plain Python.
Generate Thumbnails With an API
Try ThumbAPI free. 50 credits per month, no credit card required. One API call, production-ready output.